Halloween Makeup Ideas!


I'm sure if you've followed me on social media for a while you know I adore Halloween. I'm a firm believer that you're never too old to dress up, put on some creepy makeup, be a pretty pretty princess, or a bloody zombie.


I played around with a few looks this year to prepare for the spooky season ahead. You'd be surprised what you could accomplish with just some white and black eyeliner and a little imagination. 

Scary Ventriloquist-Doll That Lives Under Your Bed


This is actually really easy. You probably have everything needed already in your makeup kit. The key is make your eyes look really huge and creepy. Tips for this look:

1) If you don't have dark eyebrows, make them black with eyeliner for more contrast.

2) Using a black eyeliner, make semicircles coming down from your eyes as shown. I used Kat Von D Tattoo Liner in Trooper. It stays put, but isn't a pain to take off. Also use the eyeliner for dotting on freckles and drawing on a few bottom lashes. 

3) Fill in the semicircle (and your inner waterline) with white eyeliner, The one I used was NYX Slide-On Pencil in White. 

4) Cover your entire lip area with your foundation. Then, paint on some new pink lips. I used another Kat Von D product for the lips, the Everlasting Lip Liquid in Melancholia. Outline the lips in a heart shape with your eyeliner.


5) Don't be afraid to go a little nuts with the blush. Use the pinkest shade you have. Contour your cheekbones with a matte bronzer as well.

6) For the mouth, use that same eyeliner and draw lines both where your lips meet on the corners, and going straight down. The tip to making the ventriloquist mouth pop even more is to fill in that area with a lighter foundation or concealer. The contrast will make a big difference.


 Harley Quinn


This is probably the easiest of these three looks. I've actually looked like this before after a rough night. The key is not be too exact with the smudgey-smoke eyes. Some tips for this one:

1) Once again, contrast is key. Use a lighter shade of foundation or concealer all over your face.

2) Don't use a liquid eyeliner for this look. Use a black gel pencil with a smudge-able consistency. Fill in your brows black, then trace two big circles around your eyes.

3) Fill in the circles with your gel liner in random strokes. Don't forget your waterline! Using your fingers, rub it in with reckless abandon. Ooh I feel like I'm writing a romance novel!

4) For even more smudge and staying power, use your fingers again and rub some grey shadow on top. Blend the edges out tapered, so it's not just like two big black raccoon eyes. 


5) Once that's all in place, then you can go back and draw the up-and-down slash with the liquid liner. It'll be a lot more crisp than if you used the gel liner.

6) Do it up big time with the red lipstick. Over-line, fill in, then using a small brush, bring it out in and upward motion. Put your hair in pigtails and you're good to go!

Half-Skull Face


This one is a tad bit harder, but still relatively easy if you take your time. For this look, I'd recommend actually getting the white Halloween makeup from a store.

1) Use tape. If you feel like you can't get a straight line, just put some scotch tape on your face while you do the skull makeup.

2) Use your black gel pencil and liquid eyeliner again. I googled a ton of pictures before I did mine. There's not much advice I can give on this, you kinda just have to go with it and maybe practice a few times. There's a bunch of really good makeup artists online who can do much better skull makeup than me, but for a basic look you can pretty much just follow what I did.

3) For the teeth, use a really skinny liquid liner if you have it. You want the lines in the teeth to come up onto the face and be faded. You can also add tiny little cracks on the forehead that look cool.


Add a cheap wig on half of your head and hide with a big floppy hat. You can either get really fancy and try to make your own clothes that are half-and-half, or be lazy like me and just throw on a beat-up black shirt.


With all of these looks, keep in mind if you want them to last, make sure to use primer and a finishing spray. 
Recommendations for these:

PrimerCover FX Blemish Treatment Primer (Good for combating breakouts while wearing heavy costume makeup)

Finishing Spray: Urban Decay All-Nighter Setting Spray  (Heard so many great things about this)

Thanks for reading, everyone! Any other Halloween makeup you'd like me to try? Leave me a comment on my social media channels. Cheers! Xx


ReadmoreHalloween Makeup Ideas!
Information and Tips for Women

Clean Your Brushes Ya Filthy Animal!


I would be lost without my collection of makeup brushes and my beloved beauty blenders. With my skin finally being fairly clear and under control, the last thing I want to do is apply makeup with brushes that aren't clean or have any bacteria on them.

That's why I do a full cleaning of all my brushes weekly. Usually every Sunday I gather 'em up so that they can dry overnight and be ready for the week. 

I've heard of people using many things for brush cleansing. In the past, I've used everything from baby shampoo & face wash to the expensive cleanser specifically made for the task. 

Luckily, after a tip from one of my favorite beauty bloggers Samantha Ravndahl I now have a new routine that makes my brushes cleaner in less time AND the product is inexpensive ($4.69).

The product I speak of is Dr. Bronner's Baby Unscented Pure Castille Bar Soap. Besides that link, you can find them at Target and some CVS stores.  There's a bunch of different scents, but the mild unscented in the baby blue packaging is what I recommend. There's no fragrance, and they are vegan and fair trade, so you can feel good about supporting the company, and all that hippie-dippy shiz.


It's made from all natural good stuff, like coconut oil and jojoba, and won't irritate your skin or dry out your brushes. 

Using a circular motion, while the water is running, I simply rub the brushes into the soap bar until the water runs clean. (Don't mind my little shred of soap, I need to get a new one.)


Then rinse them, getting all the soap out, and set them to dry overnight. I usually just fold a towel and set them all upright like this, to make sure all the water gets out: 


Your brushes will be squeaky clean, and ready for another week of application. Cheers! Xx

P.S. With Halloween just around the corner, be on the lookout soon for a tutorial on this half skull-face. It's easier than it looks! 


ReadmoreClean Your Brushes Ya Filthy Animal!
Information and Tips for Women

The Case for Press-On Nails


So I'm in my brother's wedding coming up next week, and I've been thinking about what I want to do with my nails. I was thisclose to driving to the salon and getting a full set put on, and then I remembered how healthy my natural nails finally feel.

I had claw-shaped fake nails for a few months, and I was OBSESSED with them. They really did look awesome, but I needed a break. After I got them taken off, (Ouchhhh by the way..maybe I just have sensitive nail-beds but even after soaking them, it seriously hurt when the lady was pulling them off) I was pretty disappointed at how fragile and unhealthy my nails were.

They were brittle, thin, and very prone to chipping off. After a few months of nursing them back to health using OPI Nail Envy Strengthener as a base coat for polish, I now have healthy nails that I don't want to lose any time soon.

I'm not a big fan of longer natural nails, not to mention upkeep on them is hard, so I decided to try an imPress Press-On Manicure set to add some length and have that really nice shiny-gel look.


I've tried press-on nails in the past and always hated them because of the stupid glue. The dreaded extra-strength nail glue. I was never able to guess how much glue to squirt out, so I ended up with either not enough, or too much. They either fell right off, or the glue was seeping out onto my cuticles and they were stuck on there FOREVER!

Not to mention, with the traditional glue-on nails, when I eventually took them off, the glue would take off some of the nail as well, and I remember being left with a mess.

That's why I was intrigued to try the imPress, because it seemed so easy. There's no traditional glue, the perfect amount comes already pre-applied. You just peel off the clear backing, stick it on your clean nails (the kit comes with a prep pad too), buff your nails (optional but I recommend it) and voila! Plus there are some seriously cute accent nails in the packs.


The end result ended up looking like an expensive set I got at a nail studio...all for $7.99 at Walgreens. I mean I'm really classing up this Miller Lite in a beer koozie, eh?


The package says they can last up to a week. I kept mine on 6 days, and they didn't budge a bit. But the best part? NOOO DAMAGE. So important. After peeling them off and scraping away a bit of residue, you would never even know they were on. I'm a big fan & would definitely use them again.


 What's been your experience with press-on nails? Let me know in the comments! Cheers! Xx
ReadmoreThe Case for Press-On Nails
Information and Tips for Women

Holy Crap...My Makeup Lasted 14 Hours! Here's How


I'm sure if you follow my blog you know by now that I'm a product whore. If it's out there, chances are I've either tried it or researched it. Which is why I'm so happy I found a long-wear makeup solution that is mostly DRUGSTORE! Yep. What I find works best right now for making your face not budge an inch can be found at your local Rite Aid or CVS.

I've tried dozens of long-wear foundations over the years, and this week I really put them to the test. 

I had to work the sidelines of a football game 2 1/2 hours away, and still get some stuff done at the station before I left. So basically I had to do my makeup at 10am, and have it look good for the entire game that night, which was from 6pm to about 930pm. Oh...and it was like 90°. 

I know I'm always recommending these expensive products, but you'll be happy to know the primer AND foundation that lasted the entire night were L'Oreal and Maybelline! Score! 


Kinda obsessed with the new Maybelline Master Prime Blur and Smooth Primer. It has a great consistency and really makes the foundation last. 


The foundation I'm in love with is the L'Oreal Infallible Pro Matte. The primer and foundation are both around $13 each. I can't believe the coverage from such an affordable product. 


The very next day I wore one of my more expensive foundations, the Hourglass Inmaculate Foundation ($55). 


Just a few hours into another hot day, it was coming off in blotchy spots around my forehead and on my upper lip. Yes, my upper lip sweat gave me a no-makeup mustache. You can't really see it in the picture but trust me, I looked pretty silly. 


So it's not always the more expensive brands that last the longest. The Immaculate does have an amazing natural finish, but it's definitely not something I'd reach for when I had to make my face last for hours and hours. 

My other secret is Skindinavia Makeup Finishing Spray. I believe you can only get it online. I sprayed my face once right after I was done with my makeup, and once right before I went on for the game. I'm telling you, sweat, sun, football, running around...my face didn't move. This is a picture I took in the bathroom after the game. I got busted by someone walking in right after but whatevs. Ain't no shame in the selfie game. 


Hope everyone has an amazing Labor Day and enjoys the day off with some relaxation and yummy food...and thank you guys so much for reading the blog each and every week & supporting it. It makes me want to continue even when I feel like I'm fresh out of ideas! Cheers! Xx


ReadmoreHoly Crap...My Makeup Lasted 14 Hours! Here's How
Information and Tips for Women

Report Card: My First Ipsy Bag

Spoiler alert...I love ipsy. For those of you who dont know, ipsy is a monthly service that sends you a cute makeup bag with sample-sized (and a few full-sized!) products in the mail every month. It's $10 per month, and you can cancel whenever you want.

What you get is customized for you after you fill out a beauty quiz. That way, if you love perfume, hate blush, etc...they will do their best to personalize your monthly bag with products you'll love.

One aspect of ipsy I really enjoy is that you can give the products reviews and feedback on their website, which helps the companies and also earns you points towards free products. For someone like me who loves talking all things beauty, it's perfect. Plus, you have direct links to be able to purchase products you fell in love with at a discount.

I received my first one earlier this month, and if August's bag is a precursor of things to come, I'm all in. Plus, how adorable is the hot pink packaging? It's the little things that make me happy...


Here's a report card of the products I received. I'll include the retail price of each item, and if it was full or sample-sized. This month's theme was "Prep School", so the makeup bag is a black and white houndstooth pattern with a pink zipper.


1. Starlooks Luxe Longwear Eyeliner Pen - Full-Sized ($19 Value) - Grade: A


LOVING this felt-tip easy-to-apply liner. Perfect for creating a cat-eye. I wouldn't say I like it better than my absolute favorite liquid liner Kat Von D Tattoo Liner, but it really is a great product. I think the Kat is a littttle bit more smudge-proof. I'll be using it a lot, though, especially on my upper lid.

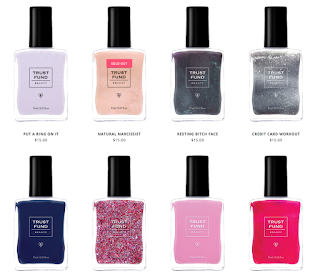
2. Trust Fund Beauty Nail Polish in 'Elegantly Wasted' - Full-Sized ($15 Value) - Grade: A


Score! Another full-sized item. Even though this isn't a color I would normally pick up at a store, I like this polish a lot. Seems like a cool little company. The polishes are 100% vegan and have fun names like "Credit Card Workout" and "Resting Bitch Face"... lolz.


Plus it dries really fast which is a big selling point for me. It looks great with a coat of Sally Hansen Gel Top Coat. Would I pay $15 for a nail polish in the future? Eh. I'd much rather save my splurges on makeup-y shtuff. Nice item, though. I'm not mad at it.


3. Briogeo Blossom and Bloom Volumizing Blowdry Spray - Sample Size (Full Size is $18) - Grade: A+


Products like this is why ipsy is so great. I would have never heard of this brand, bought this in a store, known it worked, etc. Not only does it smell wonderful, but the results are definitely there. I sprayed it on after my hair was a bit towel-dried, then blow-dried (blew-drew?) my hair. Wow. Fuller, fluffier, and thicker-looking. I struggle with limp hair a lot and this is definitely something I will be seeking out to purchase after my sample size is used up (which might take a while because it's a nice sized sample!)

4. Hikari Lip Gloss in 'Merlot' Full-Sized ($13 Value) - Grade:B+


This gloss is just a bitttt too sticky for my liking, plus the color is a little too burgundy/red for what I normally like in a gloss. But hey, it's a nice gloss to just throw in your bag to have, and I'm sure a lot of people would like it.

5. Lather Ultra-Mild Face Wash - Sample Size (Full Size is $19) - Grade: A+


Sshhh...don't tell my main bitch Philosophy Purity Made Simple....but I lerrrrve this face wash and kinda want to bring this stuff on as a side chick. Just a small amount creates the nicest lather, and leaves your face feeling so refreshed and clean after. Took off my eye makeup too.


 So overall, three full-sized items, two trial-sized, with an approximate value of over $50. For $10 a month, and being introduced to some really great products I wouldn't have normally looked into, I give ipsy a big fat thumbs up. To sign up for a monthly ipsy bag, click here. Can't wait to see what I get next month. Cheers! Xx


ReadmoreReport Card: My First Ipsy Bag
Information and Tips for Women

How to Set and Brighten Your Undereye

There's nothing worse than when you get your makeup all done, think you look great, finish getting ready, hop in the car, look in the mirror....and your under-eye area has already started creasing. You don't even necessarily need deep crows feet or wrinkles for certain products to settle in fine lines and leave you looking...not so fresh.

After experimenting with a ton of different under-eye concealers and setting powders over the years, I finally found the right duo that packs a 1-2 punch for coverage, no creasing, and a bright fresh look. 

Just look at how much of a difference a radiant under-eye area can change the look of your face. 


The first thing I do is take my favorite concealer Nars Radiant Creamy and dot it on all under my eye, down the side of my nose, and up across my cheek in an upside down triangle. No need to be perfect with it, it'll all blend. Plus you can pretend you're Ultimate Warrior.


Grab a damp Beauty Blender (you could use your finger but using the BB makes a huge difference and is much more delicate in the eye area) and pat the concealer gently into your skin with the pointed tip. 

Once you've used stippling motions to blend in the concealer, it's time to set it. 

Here's where a lot of creasing can occur, and it's not pretty. You really can't use a normal face powder for under your eye because that area of the face is much more delicate, and needs a very finely milled type of powder.

Plus if you use your face powder or any kind with rich color in it, it can oxidize with the concealer and make your under-eye dark and shadow-y or a weird color. Blech. 

My absolute favorite new product in my kit right now is  Laura Mercier Secret Brightening Powder. Sweeeet Hallelujerrr I love this stuff. It's a lightweight translucent powder that gives a perfecting glow without settling into fine lines.


Using the same beauty blender, stick the pointed end into the powder and then bounce that off the skin over all the areas you applied the concealer. I'm telling you, the finish is not only brightening and very flattering, it'll keep your under-eye in place and looking like you just applied your concealer all day.

I'm sure there are other very fine HD finishing powders out there that would set just as well, but there's just some reflective qualities in the Laura Mercier that makes your under-eye look great in pictures...I can really see a difference.


Have you ever had a bad experience with using concealers or powders under your eyes? Leave me a comment...Cheers! Xx
ReadmoreHow to Set and Brighten Your Undereye
Information and Tips for Women

Report Card: The Body Shop Products


I know I've mentioned it before, but eBates really is awesome. You get cash back on any purchases you make through participating stores (there's a LOT) and there's no catch. I've already received two checks for around $30 each. The great thing is, you can look up companies you're already into, and check to see if the cash percentage is high (it changes daily). I always keep an eye out for Sephora in particular, they fluctuate between 4-10%.

So when I saw The Body Shop was at 8% cash back last week, AND they were having a 'Buy 3 Get 3 Free' sale, I had to jump on that and decided to order a few products to try out. I've been a huge fan of their rich body butters for years, they're kind of a cult classic for a lot of people.


They're also big advocate of socially conscious business practices, and they focus on high-quality, naturally-inspired ingredients produced ethically and sustainably, so you can feel good about supporting them.

I put together a little report card of the products I received to let you know which ones are keepers and which ones....well, just read on.


1. Mega Satsuma Shower Gel ($20)- A
 
Mmm. The citrusy smell of the Satsuma is sooo nice in the morning. Really helps wake you up a bit. It's like orange juice for the nose. What?

Plus since I got the 'Mega' size, it will probably last me about a year. The only reason I didn't give it an A+ is that I would like to see a little bit more lather out of it. I like having to squeeze out all the extra soapy goodness from my loofah after I'm done, not add more gel on. Jah feel?

Overall though, love it. Refreshing.

2. Tea Tree Oil Squeaky Clean Exfoliating Scrub ($15) - A+
3. Tea Tree Oil Face Mask ($16.50) A+


I truly love Tea Tree Oil products. They are so cooling and cleansing, and really are great for your skin. Neither one of these products disappointed. I used the scrub first, then put the mask on. The mask isn't drying at all. My skin was left feeling refreshed and, as the name mentions, squeaky clean. Thumbs-up. 

4. Honey Bronze Shimmering Dry Oil ($22) - F


Oy. I got this because I thought it would look great to slather on some shimmering oil on my legs after the shower for a nice glistening look. It also was supposed to add a bit of a tan. Oh, there was shimmer alright.

 But the smell....bleeeechhhhhhh! My boyfriend's exact words: "Wow babe that smells like two-day-old butthole." And he's right. It smells like the most fake flowery old-lady perfume ever, and it's STRONG.

 I gave it to my mom, because she's an old lady so I thought maybe she'd like it (just kidding mom I love you), but she texted me the next day saying that she was currently taking a second shower because she couldn't get the "decaying goat" smell off of her. Let's just say I don't recommend this.

**Disclaimer: After I complained about the product to the Body Shop, they very quickly and courteously made things right. I was able to pick out any product I wanted up to $22, so I just got a Body Butter since I know I love them. Which brings me to...

5. Coconut Body Butter ($21) - A


I've tried a bunch of Body Butter scents over the years but I think I found my favorite. It's coconut without being in-your-face coconut, and it's just so luxurious. The lotion is very thick and creamy, so it's perfect for right after a nice long bath or shower when you're getting ready for bed and want to be a little moisturized, smooth, pea in a pod.

 It does take a bit for the lotion to absorb, so I wouldn't recommend it for your legs every day because it can be a bit slippery if not rubbed in all the way. I would definitely recommend any of the Body Butters, though. My other favorites are Pink Grapefruit and Mango.

6. All-In-One-Face Base ($22) - B+


This isn't something I'd use every day, but it's nice to have an extra powder in my arsenal. I tried using it with a wet sponge for more coverage, but didn't like the consistency. I do like it as a powder, but the shade is way too light. I even ordered a shade that seemed too dark for me because I read the reviews and that was a prevalent complaint...but it was still too light. This is give-or-take for me.

Overall, I do like really like Body Shop products, especially the entire line of Tea Tree Oil. If you're going to order something, go with one of those products or any body butter, You won't be disappointed. None of them smell like two-day-old butthole. Cheers! Xx


ReadmoreReport Card: The Body Shop Products
Information and Tips for Women
Related Posts Plugin for WordPress, Blogger...